Tuesday, March 30, 2010

Happy (Early) Easter!!

The final Easter dessert tray (not including the carrot cake) that we shared with our wonderful family for an Easter dinner. Hope you all have a Happy Easter and the Easter Bunny brings you lots of "Sweets & Treats!"


Our Crazy Lil' Bunny Rabbit

We have our very own Easter Bunny this year!


We swear our little Baxter is part rabbit. He hops around instead of running...its quite entertaining! We bought him a little "coat" for the cold Maryland days, however, Baxter is clearly not a fan, but I thought it was so funny, I just had to share! It must be too heavy for him, as he walks backwards in it!


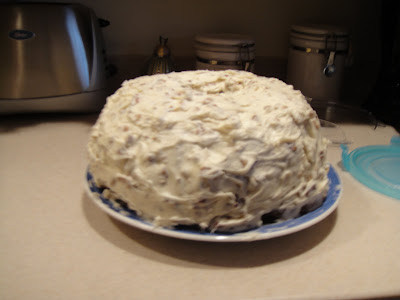
Pioneer Carrot Cake

Have you heard of the Pioneer Woman? She is just fabulous! I got this recipe from her, as I have been recently reading her blog. This recipe sounded outstanding, so I added it to my list of Easter recipes to try out for Easter dinner at my parent's house this past weekend (we celebrated a week early since many family members were out of town on the actual day of Easter this year).

Ingredients
2 cups sugar
1 cup vegetable oil
4 eggs
2 cups flour
1/2 tsp salt
1 tsp baking powder
1 tsp baking soda
1 tsp cinnamon
2 cups grated carrots

Ingredients for Icing
1 stick butter, softened
8 oz cream cheese, softened
1 pound powdered sugar (one box)
2 tsp vanilla
1 cup pecans, finely chopped


Preheat oven to 350 degrees. Mix together sugar, oil and eggs in large bowl. In another large bowl sift together flour, salt, baking powder, baking soda, and cinammon. Add dry ingredients to wet ingredients and mix well. Add carrots and mix well.
Grease either a 9 x 13 pan or a bundt pan. Pour cake mix into pan and place into oven. Bake for 25 min for a sheet cake or 50 min for a bundt cake. Now, I have to tell you, I used a bundt pan and my toothpick didnt come out very clean at 50 min, so I put it back in for another 5 mins. I think that was too long as it turned out a bit dry, so I definately would follow the directions next time for 50 minutes.

Let cake cool completely.


While it's cooling, make your icing my creaming together butter and cream cheese. Add sugar and vanilla and blend well. Mix in nuts. Spread on cooled cake.


ENJOY!

Easter Coconut Cupcakes

So,everyone has heard of Barefoot Contessa and her yummy coconut cupcakes, as well as see the box mix sold in retail stores. Well, I much prefer the homemade version of any baked good, so I searched the internet for her delicious recipe and found just what I was looking for! What better time to try out a coconut cake recipe than Easter time!?!?

Ingredients
3 sticks unsalted butter, softened
2 cups sugar
5 extra large eggs (I used 6 large eggs)
1 1/2 tsp vanilla extract
1 1/2 tsp almond extract
3 cups flour
1 tsp baking powder
1/2 tsp baking soda
1/2 tsp salt
1 cup buttermilk
14 ounces sweetened, shredded coconut (in a bag)

Ingredients for Icing
16 ounces cream cheese, softened
3 sticks unsalted butter, softened
1 tsp vanilla extract
1/2 tsp almond extract
1 1/2 pounds powdered sugar (one and half boxes)

Preheat oven to 325 degrees. Cream butter and sugar in mixer until light and fluffy, about 5 minutes. On low speed, add eggs, one at a time. Add vanilla and almond extracts and mix well.
In seperate bowl, mix together flour, baking soda, baking powder, and salt. In 3 parts, alternately add dry ingredients and buttermilk, starting and finishing with dry ingredients. Fold in 7 ounces of coconut.
Line muffin pan with liners. Fill each each to top with batter. Bake 25-30 minutes, until toothpick comes out clean and tops are golden brown. Allow to cool completely.

Meanwhile, you have plently of time to make the icing!
On low speed, cream together cream cheese, butter, vanilla and almond extracts. Add powdered sugar and mix until smooth.
After cupcakes have cooled, ice cupcakes and top with remaining shredded coconut.


For fun, you can decorate the top with anything your heart desires. Since it was Easter, I thought it would be cute to top with tiny jelly beans.

ENJOY!

Cake Balls!!!

This recipe is not only easy and and delicious, but also makes for a beautiful presentation! I searched a couple different recipes, all of which were pretty similar, but I changed a few things around. Try them out -I guarentee you'll love them and so will your guests!

Ingredients
1 box of cake mix
ingredients for cake mix
1 can of ready made icing (fancy, I know, right?)
2 bags white chocolate melting chips


Follow the directions on the back of the cake box to make your cake in a 9 x 13 pan. Instead of using vegetable oil and water, I used butter and milk to make it taste more like a homemade cake (that could be all in my head, though, do as you please). Let cake cool overnight with a tea towel over top. The next morning, slice cake into 4 seperate sections. Take one section at a time, place in large mixing bowl, and use two forks to break the cake up into tiny crumbs. The more crumbs, the better!


After you have crumbled up all 4 sections, you will have a big bowl like this. I know, doesn't look very appetizing, but I swear, work with me...it will get better!
Add 3/4 of the can into the crumbs. Yes, just plop it right in there! (Many recipes call for the whole can, but I think it would get to goopy, and decided to go for just 3/4 of the can). Mix the icing through so you cannot see any of the icing. After all is mixed through, use a melon baller or cookie scoop and scoop out a small amout of cake mix. Shape each into little balls with your hands and place on baking sheet lined with waxed paper. After all of your cake mix has been used, place baking sheet in the freezer, uncovered, for at least one hour. (I was going out for a while, so I placed them in the refrigerator for a couple hours and they did fine.)

Next, when the cake balls are nice and firm, melt the chocolate melting chips. (I do this by popping them in a microwaveable bowl, but you can certainly get out the double boiler and go that route, too.) I also added a little vegetable shortening, like Crisco, to the chocolate and stirred for a more glossy finishing on the cake balls. That's optional, though. Now, for the tricky part. I wish I had taken pictures, but I was so caught up in the moment, I completely forgot! I gently dropped each ball into the bowl of melted chocolate. Then I used a fork to scoop up the ball from underneath and used a spoon to scoop chocolate on top to cover the ball and then gently placed the ball back down on the baking sheet (which is, by the way, still covered with waxed paper). Do this for all your cake balls. You can also gently drop the ball in and roll around, but be careful the cake does not come apart, or you will have bumpy cake balls! Also, if your chocolate gets too thick, you can add a little shortening to it and place back in microwave to reheat. After all the balls have been nicely covered, seperate the chocolate into two different bowls. Add food coloring to each one. Put colored chocolate in a ziplock bag, cut a tiny hole, and go to town with your beautiful drizzling designs! I made pink and green for easter, but you can customize your colors to any celebration you are hosting!

ENJOY!

Sugar Cookies with Royal Icing

This recipe is from Williams & Sonoma, one of my VERY favorite stores!
Ingredients for Cookies
2 sticks unsalted butter, softened
3/4 cup sugar
3 egg yolks
1 1/2 tsp vanilla extract
2 1/2 cup flour
1 tsp baking powder
1/2 tsp salt

Ingredients for Icing
3 egg whites
4 1/2 cups powdered sugar
1/2 tsp cream of tartar
pinch of salt
couple drops of vanilla


Beat together butter and sugar on medium until light and fluffy. Add egg yolks, one at a time (and keep the egg whites for the Royal Icing recipe!). Add vanilla and mix (or you can be very Marth Stewart-like and use real vanilla bean like W&S called for). In seperate bowl, sift together flour, baking powder, and salt. Gradually add the dry ingredients to the wet ingredients and mix well. Divide dough into 4 equal parts and roll each into ball.

Flatten each ball into a disc, wrap each in plastic wrap, and refrigerate overnight. (Can be made up to 3 days before)

Preheat oven to 350 degrees. W & S suggests buttering baking sheets, I say lets go the easy way and spray baking sheets with butter flavored cooking spray. Roll out disc on floured surface (W&S says roll out to about 1/4 inch. I like mine as thin as possible). Cut out cookie shapes, transfer to baking sheet and continue with remaining dough. Bake until edges of cookies are golden brown, about 8 minutes (mine were best at 7 min and 45 sec). Let cool completely before decorating. Cookies can be stored in air tight container for up to one week.


THIS, my friends, is the real reason I got married! For my precious Kitchen Aid! JK, B! How beautiful is this?!?! I dont even want to tell you how long it took me to decide what color to get and how many times my poor hubby had to carry this thing back and forth to the store!
Now, for the fun part~Decorating!!!
Beat egg whites, sugar, cream of tartar, and salt on med-low speed until blended. Add vanilla and beat on med-high until mixture nearly triples in volume, about 8 minutes. Easy as that...go ahead and add some colorings and decorate to your heart's desire!

I made easter bunnies, tulips, and butterflies.


For the Easter Bunny, I iced all over with white icing and let dry. Made pink icing and placed in ziplock bag, cut tiny hole, and made pink ears and a nose for the bunny and then dipped into pink sugar glitter to add some sparklies! Then I took a black gel pen and added eyes and a mouth.


For the tulips, I made pink icing and covered the entire cookie in pink, and while still wet, I sprinkled pink sugar glitter all over.


For the butterflies, I made yellow icing and covered the entire butterfly. My original idea was to make purple and decorate the center of the butterfly with purple icing and purple sugar glitter, however, I got lazy, and just made yellow. To add some fun colors, I sprinkled confetti sprinkles all over the wet icing.


I'm sorry, but I forgot to take a picture of my final cookies, so here's a picture of the bunny and butterfly, from what you can see.


Friday, March 26, 2010

The Price is Right!

Somewhere along the lines of the engagement and our wedding day, someone told me that a great way to keep a diamond ring nice and sparkly was to soak it in Efferdent, or any other denture cleanser. I know it sounds gross, but boy does it work!!! Give it a try and let me know what you think...


Another beauty tip that I was informed about was how wonderful Vaseline is for removing eye makeup! It takes it off in no time at all and a big jar lasts forever!

What are your best beauty secrets???

Wednesday, March 24, 2010

Pure Bliss!

I was in heaven yesterday when my gracious mother-in-law surprised me with the Clarisonic! I have had my eye on this for a while, but since we are trying to save up for a new house in the future, my eye candy was put on the back burner. Can you image how excited I was last night!? I can't wait to give you my feedback in a couple weeks!

Saturday, March 20, 2010

Speeding Up!

So, to bring you up to speed, we have been quite busy since our September wedding. I started a new job, which I am already loving! At first I was nervous leaving the job where I was in my comfort zone with a great group of girls who had become wonderful friends. But, I love where I am now too, and although no one can replace the girls at my previous job, I have meet a bunch of new wonderful people already and am really enjoying my job! In Febuary we also bought a little puppy. Baxter is such a joy to have in our home! He makes us laugh and smile! We cannot wait until he gets the rest of his vaccines in a couple of weeks so he can run around outside and enjoy all the beautiful weather we are having!


Aloha Kaua'i

After a little plane trip to Kaui, we came to Beach House restaurant for cocktails at happy hour. What a view!!!
We took a sunset cruise on the Napoli Coast-breathtakingly beautiful and so much fun!


Back at the resort, at the Grand Hyatt

Newlyweds!

On the Road to Hana

OK, so I realized the last post was like a showcase of the hubby and I, so I will focus more on the scenery in Hana.
This is our view on the Road to Hana. The Road to Hana has over 670 turns, which can be quite nauseating at times! But the scenery is beautiful! And there are plenty of stops worth taking, for example, we found the BEST banana bread on earth at a little shop!
Ahhh...we arrived at Hotel Hana and these are the breathtakingly gorgeous cottages we stayed in! There was no air conditioning or televisions or anything. It was complete R&R!

The pool and hot tub overlooked the ocean


Lava rock hot tub overlooking the ocean, too! I'm telling you, no matter which way you looked, it was all so beautiful, you couldnt imagine it was real!


Aloha, Maui!

Brian's mom made sure we road in style to the airport in the morning!
Aloha beautiful scenery, beaches, cocktails, and paradise!!!!

Best dinner ever! If you go to Maui, you must try Mama's Fish House in Central Maui! Beautiful scenery and fun cocktails while you wait for your table.

Luau night!

Our last night in Maui. Enjoying a wonderful dinner at Pacifico's on the beach ~ what more could you ask for?!

And No, I Didnt Forget....

THE BACHY PARTY!!!
Will post just a few pictures...
Out in West Palm Beach, Florida
I swear, nothing bad came of this!

Dancing on the tables at Opa! SOOOO fun!!!


Yes, that is me with the motorcycle helmet on! We had a BLAST!

Wedding Odds and Ends...

Our favors: old fashion candy stick in pineapple flavor with a tag on it that read:
"Mahalo"
(Thank You)
Lauren & Brian
See you when we return from Hawaii
Monogrammed napkins

Monogrammed program (our invitation was also monogrammed exactly like this to match)

Brian and I putting together the out of town gift bags which included water bottles, Reb's chocolate candy assortment, UTZ chips, Goetz's caramels, Berger Cookies and a few other odds and ends.

Getting our marriage license at the courthouse...what an experience!!!